The can looked so promising.
“Professional Chemical Clean in 10 Minutes.” “Removes Mould & Bacteria.” “Fresh Lemon Scent.” At S$18 from the hardware store, it seemed like the perfect solution. Why pay S$80-150 for a professional chemical wash when you could do it yourself for a fraction of the cost?
Three weeks later, your aircon smells worse than before. The cool air feels weak. And now there’s a slow drip from the indoor unit that wasn’t there before.
You’ve just learned an expensive lesson that Singapore’s humidity teaches every DIY enthusiast eventually: aircon chemical cleaning isn’t what the spray can makes it look like.
This article reveals what happens inside your aircon when you attempt a DIY chemical wash, the damage that can result, and why the S$50 you thought you saved might cost you S$500-1,500 in repairs—or an entirely new fancoil unit.
Part 1: What Actually Happens During a Aircon Chemical Wash
Before understanding what goes wrong with DIY cleaning, you need to understand what a proper chemical wash actually involves.
The Professional Process
When a trained technician performs a chemical wash, this is what happens:
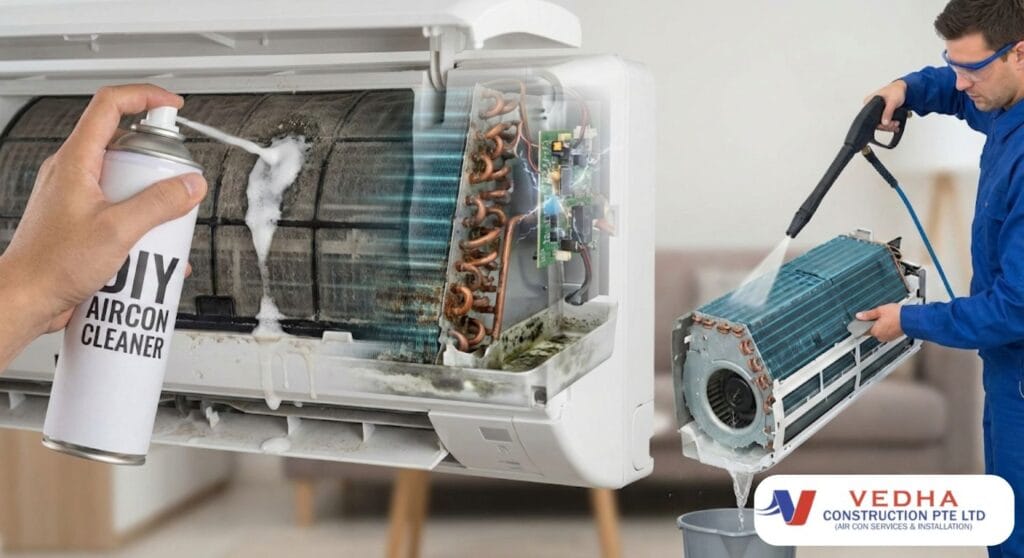
Step 1: Complete disassembly
The technician removes:
- The front panel and filters
- The fan blower (roller/barrel)
- The drainage tray
- Often, the evaporator coil housing
This exposes every surface where dirt, mould, and bacteria accumulate.
Step 2: Component-specific cleaning
Different parts get different treatment:
- Evaporator coils: Alkaline or acid-based industrial cleaner, depending on contamination type
- Fan blower: Degreasing solution to remove the sticky film of dirt
- Drainage tray: Biocide treatment to kill mould at the source
- Drainage pipe: Flushing to clear blockages
Step 3: High-pressure rinsing
This is critical. The technician uses pressurised water to completely flush out:
- The cleaning chemicals
- Dissolved dirt and grime
- Mould spores and bacteria
- Any residue that could cause future problems
This rinsing step typically uses 2-5 litres of water per unit.
Step 4: Proper drying and reassembly
Components are dried, the unit is reassembled correctly, and the system is tested.
Total time: 45-90 minutes per unit.
The DIY Spray Can Process
Now here’s what happens when you use a S$15-25 aerosol spray:
Step 1: Surface access only
You open the front panel and remove the filters. That’s it. You cannot access:
- The back of the evaporator coils
- The fan blower interior
- The drainage tray (where most mould grows)
- The drainage pipe
Step 2: Spray application
You spray the foam onto the visible front surface of the evaporator coils. The foam expands, appears to be working, and smells pleasantly of lemon or fresh air.
Step 3: “No-rinse” evaporation
Most DIY sprays are marketed as “no-rinse” or “self-cleaning.” The theory is that condensation from the aircon will wash away the chemical and dissolved dirt.
Step 4: Turn on and hope
You turn the aircon back on. It smells fresh. Success… right?
Total time: 10-15 minutes.
The Critical Difference
Do you see the problem?
Professional wash: Complete disassembly + Industrial chemicals + High-pressure rinse + 60-90 minutes
DIY spray: Surface access only + Consumer chemicals + No rinse + 10 minutes
The DIY approach addresses perhaps 20-30% of where contamination actually lives. The remaining 70-80% is untouched—and about to get worse.
Part 2: The Five Hidden Dangers
Danger #1: Chemical Residue That Eats Your Coils
This is the most expensive danger, and most homeowners have no idea it’s happening.
The chemistry problem:
Professional coil cleaners use alkaline solutions (sodium hydroxide, potassium hydroxide) or acid-based solutions to dissolve dirt. These chemicals are highly effective—but they’re also corrosive to aluminium and copper, the metals your evaporator coils are made from.
Professional technicians know this. That’s why proper chemical wash includes extensive rinsing: 10-15 minutes of high-pressure water to flush every trace of chemical from the coils.
DIY “no-rinse” sprays can’t do this. They rely on condensation to wash away the chemicals. But in Singapore’s humidity, here’s what actually happens:
- Foam is applied to coils
- Chemical begins dissolving dirt
- Foam starts to dry before fully draining
- Condensation occurs, but doesn’t reach all areas
- Chemical residue remains on fins and inside coil structure
- Residue continues reacting with aluminium over weeks and months
The damage:
Sodium hydroxide and similar alkaline cleaners react with aluminium to form aluminium hydroxide. This reaction:
- Slowly etches away the aluminium fins
- Creates microscopic holes in copper refrigerant pipes
- Weakens the coil structure over time
The symptom you’ll notice:
Your aircon develops a refrigerant leak 6-18 months after DIY chemical cleaning. The technician finds tiny holes in the evaporator coil. The repair quote? S$500-800 for a coil replacement—if your unit’s coil is still available. For older units, you may need an entirely new fancoil: S$800-1,500+.
What the manufacturer won’t tell you:
They won’t honour warranty claims if they find chemical damage to the coils. And they can tell. Corrosion patterns from improper chemical cleaning are distinctive.
Danger #2: Mould You Made Worse, Not Better
This danger is invisible until it affects your health.
Where mould actually grows:
In Singapore’s humid climate, mould colonises your aircon in predictable locations:
- Fan blower barrel: The cylinder that pushes air into your room
- Back of the drainage tray: Dark, wet, never dries out
- Behind the evaporator coils: The V-shaped coil traps moisture at the back
- Inside the drainage pipe: Constant moisture, perfect mould environment
DIY sprays reach exactly one of these areas: the front surface of the evaporator coils.
What happens when you spray:
- Foam contacts front of coils
- Some mould spores on the front surface are killed
- Chemical and dissolved mould drip down into the drainage tray
- Drainage tray now has extra moisture plus organic matter (dead mould)
- Living mould behind the coils and in the blower remains untouched
- Conditions in the drainage tray are now even better for mould growth
The result:
Within 2-4 weeks, you notice the musty smell returning—often worse than before. This isn’t because the spray didn’t work; it’s because the spray created better growing conditions for the mould that was never touched.
The health implication:
Common mould species found in Singapore aircons include:
- Aspergillus: Can cause respiratory infections and allergic reactions
- Cladosporium: Major trigger for asthma and allergies
- Penicillium: Causes sinus infections and “aircon cough”
Every time your aircon runs, it blows air across these mould colonies and directly into your face while you sleep.
A professional chemical wash with full disassembly removes 95-99% of mould. A DIY spray might kill 30% while making conditions better for the remaining 70% to multiply.
Danger #3: Electrical Damage from Water Exposure
Modern aircons aren’t simple machines. They contain sophisticated electronic components that can be destroyed by water in the wrong places.
The electronics inside your aircon:
- PCB (Printed Circuit Board): The “brain” controlling all functions
- Sensors: Temperature sensors, humidity sensors, motion sensors
- Capacitors and relays: Control fan speed and compressor operation
- Transformer and power supply: Convert electricity for different components
How DIY cleaning damages electronics:
When you spray foam cleaner into your aircon, the liquid has to go somewhere. Without proper technique, it can:
- Drip onto the PCB: Most indoor units have the circuit board mounted below or behind the evaporator. Liquid running down the coils can reach the board.
- Pool in the drainage tray and overflow: If the drainage is partially blocked (common in Singapore), excess liquid backs up and can reach electrical components.
- Create conductive paths: Even after drying, chemical residue can absorb moisture from the air and create electrical bridges between components.
The damage:
When water or conductive residue contacts the PCB:
- Short circuits: Instant component failure
- Corrosion: Slow degradation of solder joints and traces
- Intermittent faults: Random errors, unit turning off unexpectedly, error codes
The cost:
PCB replacement: S$300-800 depending on brand and model
For premium brands like Daikin or Mitsubishi Electric, PCB costs can exceed S$1,000. And unlike mechanical parts, PCBs must be brand-specific—there are no generic replacements.
The warranty situation:
Water damage to electronics is not covered under warranty. If the technician finds moisture damage patterns, your claim will be rejected.
Danger #4: Incomplete Cleaning That Accelerates Wear
This danger is subtle but ultimately expensive.
The filter effect:
A partially cleaned evaporator coil is like a partially cleaned water filter. The areas that got sprayed might look cleaner, but the untouched areas continue accumulating dirt. Worse, the dirt in those areas becomes more compacted as airflow is redirected through the “cleaner” sections.
What happens to your aircon:
- Reduced airflow: Partially blocked coils restrict air movement
- Compressor works harder: Less efficient heat transfer means longer run times
- Ice formation: Severe blockage can cause the evaporator to freeze
- Higher electricity bills: System runs longer to achieve same cooling
- Shortened lifespan: Increased stress accelerates wear on all components
The false economy:
You saved S$80-150 on a professional chemical wash.
But your aircon now:
- Uses 10-20% more electricity (S$15-30/month extra for heavy users)
- Runs 2-3 years less than its potential lifespan
- Will need professional cleaning anyway—plus remediation work
Danger #5: Physical Damage from Improper Handling
DIY enthusiasts often underestimate how delicate aircon components are.
The fragile parts:
Evaporator fins:
Those thin metal plates on the cooling coils are aluminium fins spaced about 1-2mm apart. They’re extremely delicate. Bending even a small section:
- Restricts airflow through that area
- Reduces heat transfer efficiency
- Creates hotspots that can lead to ice formation
A fingernail, a spray can nozzle, or a screwdriver used to “open things up” can flatten dozens of fins instantly.
Fan blower:
The barrel-shaped fan is precisely balanced. Cleaning it while still mounted (the only DIY option) can:
- Create uneven weight distribution from accumulated cleaning product
- Damage the motor bearings from excessive moisture
- Bend blades, causing vibration and noise
Drainage components:
The drainage tray and pipe are designed for specific water flow rates. Pushing cleaning chemicals through without proper flushing can:
- Leave residue that attracts more mould
- Create blockages from dissolved but not removed debris
- Damage plastic components with harsh chemicals
Part 3: The Real Cost Comparison
Let’s be honest about the numbers.
Scenario 1: DIY Cleaning Works (Best Case)
Investment:
- Spray can: S$18
- Time: 20 minutes
Result:
- Surface looks cleaner
- Temporary fresh smell (2-4 weeks)
- No visible damage
Reality:
- Mould in unreachable areas continues growing
- Chemical residue begins slow corrosion
- You repeat this every 1-2 months
Annual cost: S$108-216 in spray cans, still need professional service eventually
Scenario 2: DIY Cleaning Causes Problems (Common Case)
Initial “savings”: S$18
Subsequent costs:
- Professional chemical wash to address worsening smell: S$80-150
- Discovery of chemical residue damage
- Coil cleaning cannot fix damage; repair needed
- Evaporator coil replacement: S$500-800
Total cost: S$598-968
Versus: Professional chemical wash from the start: S$80-150
Scenario 3: DIY Cleaning Causes Major Damage (Worst Case)
Initial “savings”: S$18
Subsequent costs:
- Water damage to PCB: S$400-800 for replacement
- Chemical damage to coils: S$500-800 for replacement
- Or: Complete fancoil unit replacement: S$800-1,500
Additional costs:
- Multiple service calls for diagnosis: S$50-80 each
- Temporary portable aircon rental while waiting for parts: S$100-200
Total cost: S$1,300-2,600
Versus: Professional chemical wash from the start: S$80-150
The Warranty Factor
Most aircon manufacturers void warranty coverage for:
- Damage caused by non-professional servicing
- Chemical damage from improper cleaning products
- Water damage to electrical components
A new System 3 aircon costing S$4,000-6,000 loses all warranty protection the moment you spray that S$18 can inside it.
Part 4: What DIY Cleaning IS Safe For
We’re not saying you should never touch your aircon. There are DIY maintenance tasks that are both safe and beneficial.
Safe DIY Tasks
Filter cleaning: Weekly to bi-weekly
Remove the front panel, take out the filters, rinse with water, dry completely, replace. This is the single most effective maintenance task and costs nothing.
Front panel and casing wipe-down: Monthly
Use a damp cloth to wipe dust from the exterior. Don’t spray anything; don’t use harsh cleaners.
Visible dust removal: Monthly
If you can see dust on the front of the evaporator coils, use a soft brush or vacuum cleaner brush attachment to gently remove loose dust. Don’t scrub. Don’t use chemicals.
Checking for leaks: After every service
Visual inspection of the indoor unit for water drips. Catching a drainage problem early saves money.
Tasks That Require Professionals
Anything involving chemicals: Leave it to people with proper training and equipment.
Anything requiring disassembly: The risk of damage exceeds the cost of professional service.
Anything involving the outdoor unit: High-pressure cleaning of the condenser requires specific equipment and techniques.
Anything electrical: Never attempt repairs on electrical components.
Part 5: How Professionals Protect Your Investment
Understanding what makes professional service different helps you appreciate its value.
Proper Chemical Selection
Professional technicians use:
- Alkaline cleaners for heavy grease and grime
- Acidic cleaners for mineral deposits and certain mould types
- Biocides to kill bacteria and prevent regrowth
- Neutralising agents to stop chemical reactions before reassembly
They select the right product based on your unit’s condition and materials. Using the wrong chemical on the wrong surface causes damage—even for professionals. That’s why training matters.
Complete Rinsing Protocols
The most important step in any chemical wash is rinsing. Professionals:
- Use high-pressure water (low enough not to damage fins, high enough to flush completely)
- Rinse for 10-15 minutes per unit
- Verify that all chemical traces are removed
- Check drainage function during rinsing
This step alone takes longer than an entire DIY cleaning session.
Proper Drying and Testing
Before reassembly, professionals ensure:
- All components are completely dry
- No moisture remains near electrical parts
- Drainage flows freely
- Fan operates without unusual noise or vibration
They test the unit before leaving to verify everything works correctly.
Documentation and Warranty Compliance
Professional service provides:
- Record of service performed
- Documentation of any issues found
- Warranty-compliant maintenance history
- Recommendations for future service
This paper trail protects you if problems arise later.
Part 6: Signs You Need Professional Help (Not DIY)
These symptoms indicate problems beyond what any spray can address:
Immediate Professional Service Needed
Water leaking from the unit:
Drainage blockage or coil issues. DIY chemical spray will make this worse by adding more liquid to an already compromised drainage system.
Musty or mouldy smell:
The mould source is in areas spray can’t reach. A professional must disassemble to access and treat the actual contamination.
Weak airflow despite clean filters:
Blockage inside the evaporator coils or fan blower. Spray cannot clear internal blockages.
Unit not cooling effectively:
Could be refrigerant, could be blockage, could be electrical. Needs professional diagnosis before any cleaning.
Unusual sounds:
Mechanical issues with fan motor or loose components. Chemical cleaning won’t help and might make things worse.
Error codes on remote:
Electrical or sensor issues requiring professional diagnosis.
When Professional Chemical Wash Is Due
Even without obvious problems, schedule professional chemical wash when:
- Last professional service was more than 12 months ago
- Unit runs 8+ hours daily
- Unit is in a dusty or humid environment
- Someone in household has allergies or respiratory issues
- You notice gradual decrease in cooling performance
Part 7: Choosing the Right Professional Service
Not all chemical wash services are equal. Here’s what to look for:
Essential Qualifications
- BCA-registered or trained technicians
- Company with established track record
- Written quotes before work begins
- Warranty on service performed
Questions to Ask
- Do you fully disassemble for chemical wash? (The answer should be yes for a complete chemical wash)
- What chemicals do you use? (They should be able to explain alkaline/acid cleaners and biocides)
- How long will the service take? (Under 45 minutes per unit suggests incomplete service)
- Do you test the unit after service? (Yes, always)
- Is the service documented? (Written records protect both parties)
Red Flags
- Prices significantly below market (S$40 for chemical wash suggests corners are being cut)
- No explanation of what the service includes
- Refusal to provide company information or credentials
- Pressure to add unnecessary services
- No testing of unit after service
The Complete DIY vs Professional Comparison
| Factor | DIY Spray Can | Professional Chemical Wash |
|---|---|---|
| Cost | S$15-25 per application | S$80-150 per unit |
| Time | 10-15 minutes | 45-90 minutes |
| Disassembly | None | Complete |
| Areas cleaned | Front coil surface only (~20%) | All components (~95%) |
| Rinsing | None (condensation only) | High-pressure, 10-15 min |
| Mould removal | Surface only | Including hidden areas |
| Risk of damage | High (chemical residue, water damage) | Low (trained professionals) |
| Warranty impact | May void warranty | Maintains warranty |
| Effectiveness duration | 2-4 weeks | 6-12 months |
| Potential for hidden damage | High | Low |
Conclusion: The S$50 You Didn’t Save
That S$18 spray can at NTUC looks like a bargain. Professional chemical wash at S$80-150 looks expensive in comparison. The math seems simple.
But the math isn’t simple. Here’s what you’re actually comparing:
DIY spray:
- 20% of the job done
- 0% of the rinsing done
- Risk of S$300-1,500 in damage
- Problems deferred, not solved
- Warranty at risk
Professional service:
- 95%+ of the job done
- Complete rinsing and protection
- Risk of damage close to zero
- Problems identified and resolved
- Warranty maintained
The true cost of that DIY spray isn’t S$18. It’s S$18 plus the probability-weighted cost of all the damage that might result.
And in Singapore’s humid climate, with aggressive mould growth and continuous aircon use, that probability is higher than you’d like to believe.
Every week, aircon technicians across Singapore open up units that homeowners “just cleaned last month” with DIY spray. They find:
- Mould worse than before the spray
- Chemical residue eating into coils
- Corrosion around electrical components
- Blockages from dissolved but not rinsed debris
The S$50 these homeowners thought they saved? It’s already gone—plus another S$300-1,500 in repair costs.
Professional chemical wash isn’t expensive. It’s insurance against expensive problems masquerading as cheap solutions.
Your aircon is a S$3,000-6,000 investment that your family relies on 365 days a year. Is S$80-150 per year really too much to protect it?
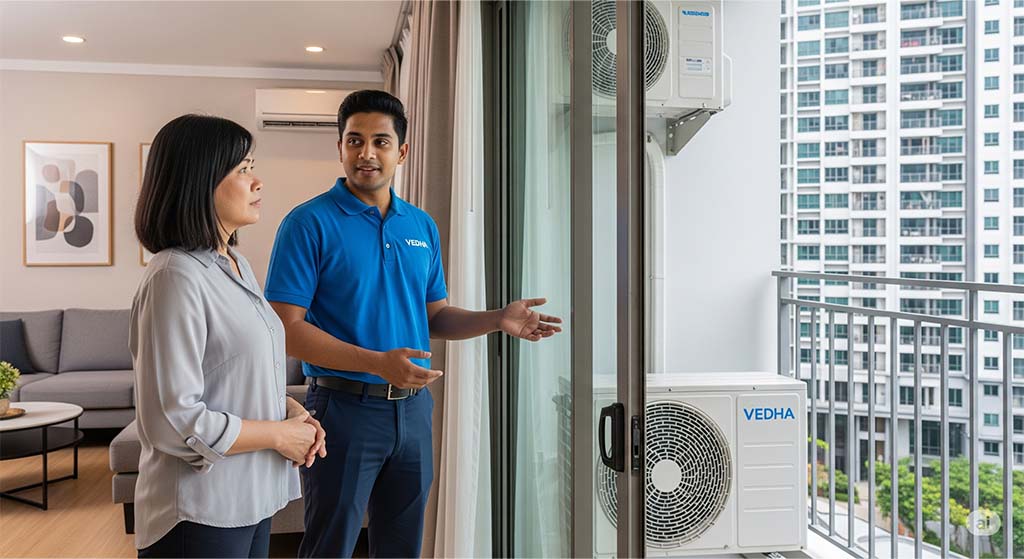
Concerned about mould, weak airflow, or that persistent smell in your aircon? VD Aircon’s professional chemical wash includes complete disassembly, industrial-grade cleaning, and thorough rinsing to protect your investment. Contact us at 96540044 for a service that actually works.

We specialize in Aircon installation, repair, and service. We have all type & model of recon compressor, full set & fancoil. Our technicians are highly proficient in their respective field and repairs and fixes aircon of various brands.