The most expensive HDB aircon mistake we have ever seen cost the homeowner $4,800 in rectification work. He had bought a System 3 from a Carousell installer for $1,650 — about $900 below the market rate. The compressor was mounted on a 1980s-grade aluminium bracket that the previous installer had reused from the old system. Three months in, the bracket gave way during a thunderstorm. The compressor crashed through a kitchen window two floors below. HDB issued an enforcement notice. The homeowner had to pay for the damaged unit below, the window repair, removal of the failed installation, a new BCA-compliant install on a stainless steel bracket, and the HDB Defect Liability application. The “saved” $900 became $4,800 in eight weeks.
That story sits in our heads every time we send a quote that is a few hundred dollars above the cheapest competitor. The Singapore HDB rules around aircon installation are not bureaucratic decoration. They were written after the building got people killed by falling units in the 1980s and 1990s. Every rule has a body count behind it.
This article is what we wish more BTO owners read before they pick an installer. Not a checklist. The rules and the reasoning, told the way a senior installer would explain them to a family member.
The Three Authorities You Are Accountable To
HDB, BCA, and NEA each regulate a different part of the installation. The HDB is the building owner. They care about the structure not collapsing and the exterior of the block not being defaced. The BCA is the safety regulator. They certify the installers and define the material grade and installation method. The NEA is the environmental regulator. They cap the noise the outdoor unit produces and the refrigerant types allowed.
Legal accountability for compliance sits with you, the flat owner. Not the installer. This is the part most homeowners do not understand until the enforcement letter arrives. If the installer disappears, HDB will still come to you for rectification. Hiring a registered installer who carries professional liability insurance is the only realistic protection. Carousell installers without company registration carry none.
What System Size You Actually Need
The standard recommendations are a System 2 for 3-room flats, System 3 for 4-room, System 4 for 5-room. They are correct as a starting point but the real answer is more specific.
A System 3 for a 4-room flat almost always means one outdoor compressor connected to three indoor units: living room, master bedroom, and one common bedroom. The second common bedroom gets no aircon. This is fine if that room is a study or storage. Bad if it is a guest room or your in-laws will sleep there when they visit. We see homeowners regret this six months in.
A System 4 in the same 4-room flat covers all three bedrooms plus living room. Adds about $800 to $1,200 to the install. Pays back in resale value because future buyers expect all bedrooms cooled.
A System 5 in a 5-room flat covers all four bedrooms and living room or, in the alternative configuration, living, master, two bedrooms, and the household shelter. The household shelter as an aircon zone is a niche choice and rarely worth the cost.
The other dimension the standard recommendations miss is cooling capacity per room. 9,000 BTU units fit a standard 9 to 12 square metre bedroom. 12,000 BTU for a master bedroom of 12 to 15 square metres. 18,000 BTU for a living and dining area in a 4-room or 5-room flat. Installing an undersized unit means it runs at 100% load forever and dies in 6 to 8 years. Oversized means it short-cycles, dehumidifies poorly, and feels clammy. We measure rooms during the site survey for this reason.
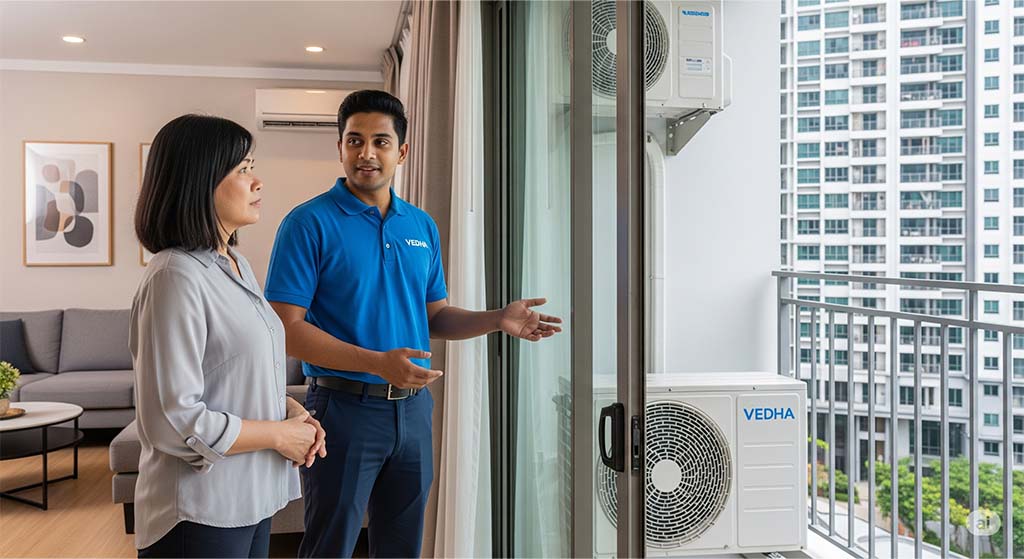
The Outdoor Unit Placement Reality
For BTO flats handed over from 2003 onwards, the rule is hard. The outdoor unit goes on the purpose-built aircon ledge. Nowhere else. Not on the service balcony. Not on a wall bracket above the kitchen window. Not improvised on the parapet. If your flat has a ledge, the unit goes on the ledge.
For older resale flats without a ledge, HDB published a set of approved external locations. The drawings are on the HDB website under “Renovation Permits”. The approved locations are typically the external wall of the master bedroom, the external wall of the service yard, or in some block types a designated structural ledge. Anything else needs a written permit application and HDB will reject most non-standard requests.
We get called every few weeks to relocate units that the previous installer put in non-approved positions. These rectifications cost the homeowner $400 to $700 plus the disruption of two installation days. HDB enforcement is patient but not forgiving. The notice arrives months after the install, often after a neighbour has complained about noise or aesthetics. By that time the homeowner has paid the original installer in full and that installer has disappeared.
The Bracket Question That Decides Everything
For wall-mounted outdoor units in older flats, the bracket is the safety component. We have seen bracket failures at 4 years, 6 years, and 11 years across various Singapore estates. The pattern is consistent. Aluminium brackets corrode through. Mild steel brackets rust through. Powder-coated brackets fail at the bolt holes where the coating gets scratched during installation.
The HDB and BCA requirement is stainless steel. The two common grades are SS 201 and SS 304. SS 201 is cheaper. SS 304 contains more chromium and more nickel, making it genuinely corrosion-resistant in Singapore’s salt-laden coastal air. We use SS 304 as standard because we have replaced too many SS 201 brackets that failed within their warranty period.
The cost difference between SS 201 and SS 304 is around $40 to $60 per bracket. The cost of bracket failure is the falling-unit liability we opened this article with. Quotes from installers who do not specify the bracket grade should be assumed to be SS 201.
The bolting matters as much as the bracket. The bracket must be bolted into the structural concrete of the wall, not into the brick or block of an internal partition. Bolts must be M10 minimum. Chemical anchoring is preferred over expansion bolts because expansion bolts loosen over time as the unit vibrates. We use Hilti HVU2 chemical anchors on every bracket installation.
Your Flat’s Power Budget Is Not Negotiable
This is the technical constraint most homeowners discover too late. The main switch rating of your HDB flat determines how much aircon you can run.
Flats built before 1994, and flats that have not been through the Electrical Home Improvement Programme, have a 30-Amp main switch. This caps the total running current of your aircon system. For a 4-room flat, the combined running current of all your aircon indoor and outdoor units cannot exceed roughly 8.5 amps. A System 4 with all units running simultaneously will trip the main breaker. The outdoor compressor weight is also capped at 80 kg per wall panel.
Flats built after 1994 typically have a 40-Amp main switch. Combined running current limit is more generous and the outdoor unit weight cap rises to 110 kg per wall panel. This allows larger systems including System 5 configurations and higher-tonnage outdoor units.
Some older estates have undergone the EHIP upgrade and now have 40-Amp switches. Other estates of similar age have not. The only way to know for sure is to check the switch rating at your flat. Look at the main DB inside the household shelter or behind the kitchen cabinet. The amp rating is printed on the switch.
If your flat is on 30-Amp and you want a powerful System 4 setup, the only legal path is to apply for an electrical upgrade through SP Group. Cost runs $800 to $1,500 depending on the block and wiring condition. Some installers will tell you to “just go for it” and hope the breaker holds. It will not. The first heatwave in March or September will trip it daily.
The Drainage Pipe That Causes Most Water Leak Complaints
Water leakage from the indoor unit is the most common aircon complaint we receive after installation. Almost every case traces to drainage installed incorrectly by the original contractor.
Singapore’s industry minimum for the drainage gradient is 1% — one centimetre of drop for every one hundred centimetres of horizontal pipe run. Anything flatter than this allows water to pool inside the pipe. The pool becomes a biofilm. The biofilm becomes a partial clog. Within 12 to 18 months, water starts backing up into the indoor unit and dripping out of the front grille.
We have removed cleaning rod sections from drain pipes that were installed with zero gradient — perfectly horizontal. The homeowner was paying for quarterly chemical washes that did nothing because the underlying drainage was a bathtub for biofilm. Re-running the drainage with proper slope solved the leak. The chemical washes had been a $400-a-year band-aid for an installation defect.
The pipe diameter matters too. 13mm is standard on the cheap end. 16mm is the upgrade. The price difference is about $25 across a typical install. The clog resistance difference is 2 to 3 times longer service life before chemical wash is needed. We use 16mm by default.
The discharge point is non-negotiable. All condensation water goes into a floor trap, almost always in a bathroom. Letting water drip down the building exterior is an HDB violation that earns an enforcement notice the first time a neighbour photographs it.
Insulation That Stops the Sweating
The refrigerant pipe carries cold gas. The ambient air in Singapore is hot and humid. Without insulation, condensation forms on the cold pipe and drips. The drips damage ceiling drywall, internal partition walls, and electrical fittings.
The insulation grade that works in Singapore humidity is 1/2-inch Armaflex. Cheap installers use 1/4-inch insulation because it costs less and looks similar from outside. The thinner insulation reaches dewpoint on the exterior surface in 80%+ relative humidity, which is most days here. The pipe starts sweating. The customer notices a wet patch on the ceiling 3 to 6 months after installation, often after the warranty has lapsed and the original installer is unreachable.
We have repaired ceiling damage caused by 1/4-inch insulation that cost the homeowner $3,200 to fix. The “saving” from the cheap installation was $50.
The HDB Form AC-02 Most Homeowners Have Never Heard Of
Every aircon installation in an HDB flat requires the installer to submit Form AC-02 to HDB within 14 days of completing the work. The form documents what was installed, where, by whom, and confirms BCA compliance. The installer files it. The homeowner is supposed to receive a copy.
Most Carousell and one-man installers skip this form entirely. The homeowner never knows it exists. The first time it comes up is years later when HDB does a routine inspection or when the homeowner wants to upgrade the system and discovers no record of the original install exists.
The consequence of an unfiled AC-02 is messy but recoverable. The current owner can apply to retrospectively register the install through HDB’s Town Council interface. The cost is around $80 to $150 in admin fees plus the cost of a fresh BCA inspection. The bigger problem is when you sell the flat. Buyers’ conveyancing lawyers increasingly ask for the AC-02 as part of the renovation disclosure. No form, no smooth sale.
We file Form AC-02 within 5 working days of every installation and email the completed form to the homeowner the same day.
The Permits You Might Need
Most aircon installations into existing power points do not need a separate permit. The Form AC-02 covers it. Permits are needed for two specific situations.
If your installation requires a new dedicated power point, the work has to be done by a licensed electrician. The electrician applies for the permit through SP Group. Cost runs $150 to $245 for the power point itself, plus $40 to $60 in permit fees. We coordinate this with our partner electricians on jobs that need it.
If your flat is older than the EHIP upgrade and the planned aircon load exceeds your 30-Amp capacity, you need an electrical upgrade to 40-Amp. This is a major works permit handled by SP Group with a 4 to 6 week processing time and cost of $800 to $1,500. Not a job you can do on a weekend.
The Noise Limit Most Installers Ignore
NEA caps outdoor unit noise at 60 dBA between 7am and 11pm, and 55 dBA between 11pm and 7am, measured at the neighbouring unit’s window. This sounds generous and most aircon units comply when new. The problem comes 4 to 6 years in, when the compressor bearings start to wear and the unit begins to vibrate the bracket.
Vibration noise is what generates neighbour complaints. The unit itself measures within the dBA limit but the bracket conducts vibration into the wall and the neighbour hears a low-frequency hum through their wall. NEA enforcement officers visit, measure, and issue a rectification order to the offending unit owner.
Proper installation prevents this. Vibration dampening pads between the compressor base and the bracket. Bolt torque set to manufacturer spec. Bracket weight loaded centrally on the wall structure. We do all three as standard. Cheap installers skip the dampening pads to save $20 per unit. We have rectified the consequences 30 to 40 times.
What to Ask the Installer You Are Considering
Five questions filter the honest installers from the rest. Use them on every quote.
Ask whether they are BCA-registered and ask for the registration number. A BCA-registered installer’s number can be verified on the BCA Directory of Registered Contractors online. Carousell installers cannot give you a number.
Ask which grade of stainless steel they use for brackets. The honest answer is SS 304. SS 201 is the cheap answer. If they cannot tell you the grade, assume SS 201.
Ask what diameter drain pipe they use and what gradient they install at. The answer should be 16mm at 1% minimum slope. Anything less is non-compliant.
Ask what thickness of Armaflex insulation they use. The answer should be 1/2-inch. 1/4-inch is the cheap shortcut.
Ask whether they will file Form AC-02 with HDB within 14 days and email you the completed form. If the answer is unclear, find a different installer.
A registered installer will answer these in 30 seconds without consulting anyone. An installer who hesitates or deflects is telling you something.
Why This Article Exists
The pattern we see in 80% of HDB rectification jobs is the same. Cheap installer. No Form AC-02. SS 201 bracket. 1/4-inch insulation. 13mm drain pipe with zero gradient. Customer saved $600 to $900 on the initial install. Customer spent $2,000 to $5,000 fixing the consequences over the following four years.
The article you just read takes 12 minutes to read. The decisions it informs save the average HDB homeowner several thousand dollars across the life of their aircon system. The math on attention versus money is unusually good.
If you are at the quote-comparison stage and want a second opinion on what other contractors are offering, we run free site surveys. The technician spends 30 to 45 minutes at your flat measuring the rooms, checking your main switch rating, inspecting the existing power point and ledge, and confirming what system size and bracket grade your specific flat needs. Written quote within 24 hours. No obligation.
Call 9654 0044 or WhatsApp the same number. Email sales@vdairconservices.com with your block and unit number if you prefer to start by message.
VD Aircon Engineering is a BCA-registered aircon installation and servicing contractor based at Mandai Estate, Singapore. The team has handled HDB installations across 16 regions and submitted Form AC-02 on every job since 2016.

We specialize in Aircon installation, repair, and service. We have all type & model of recon compressor, full set & fancoil. Our technicians are highly proficient in their respective field and repairs and fixes aircon of various brands.